The basics for MySQL are important to understand so you can make adjustments. The first in the series showed you how to set up a LAMP Server, the second in the series showed you how MySQL needs to be configured and this now shows some of the basic settings that you need to know.
If you are interested in a Live Course for Ubuntu 9.10 we provide that option as well and the Ubuntu Self-Directed Course is now available. Otherwise, we hope you find this Free mini-course useful which we will roll out over a number of days..
Basic Commands
There are a number of basic commands that you need to have to be able to use MySQL. You have already seen how to log:
mysql -p -u root
Once you are in you can list the databases that have been created with this command:

Now you need to be able to create a database that you can use. Here is the command you would use to create a database called “joomla”.

The topic of adding user accounts can be rather complex. There are a lot of options to fit all kinds of different scenarios. To keep things simple for now, we’ll just present you with a couple of examples, and then with a table that will briefly explain the options.
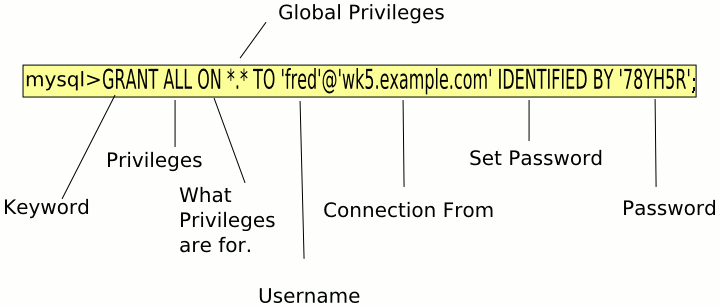
Here is the example of a user who needs to be able to do everything, including creating new databases. The only thing he won’t be able to do is to create new user accounts, since that’s your job. Also, he’ll only be connecting from his own computer, whose hostname is “wk5.example.com”. His password will be “78YH5R”.
Note: In these examples, you’ll be setting up accounts so that the users can log on from different clients. For that to work, you’ll also need to open the /etc/mysql/my.cnf file for editing, and comment out the following line:
bind-address = 127.0.0.1
by placing a # in front of it.

mysql> GRANT ALL ON *.* TO ‘fred’@'wk5.example.com’ IDENTIFIED BY ’78YH5R’;
Query OK, 0 rows affected (0.00 sec)
Note the semi-colon at the end of the command.
After you’ve created the account, you can verify the privileges that fred has been granted:
mysql> show grants for fred@wk5.example.com;
+—————————————————————————————————————————-+
| Grants for fred@wk5.example.com |
+—————————————————————————————————————————-+
| GRANT ALL PRIVILEGES ON *.* TO ‘fred’@'wk5.example.com’ IDENTIFIED BY PASSWORD ‘*5B5BF4EC5CCCB48FE859214A4B27BA4CB038EE0B’ |
+—————————————————————————————————————————-+
1 row in set (0.00 sec)
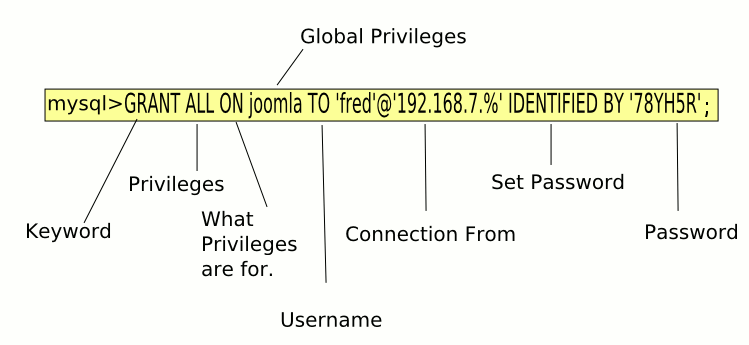
For the second example, here is the command that you would use to create privileges for fred on just one database called “joomla”.
Here fred hasn’t been assigned a permanent computer station, so he’ll be floating around on different computers on the 192.168.7 subnet.

mysql> use joomla;
Database changed
mysql> GRANT ALL ON joomla TO ‘fred’@’192.168.7.%’ IDENTIFIED BY ’78YH5R’;
Query OK, 0 rows affected (0.00 sec)
Again, you can verify that his privileges were set correctly:
mysql> show grants for ‘fred’@’192.168.7.%’;
+—————————————————————————————————————+
| Grants for fred@192.168.7.% |
+—————————————————————————————————————+
| GRANT USAGE ON *.* TO ‘fred’@’192.168.7.%’ IDENTIFIED BY PASSWORD ‘*5B5BF4EC5CCCB48FE859214A4B27BA4CB038EE0B’ |
| GRANT ALL PRIVILEGES ON `joomla`.`joomla` TO ‘fred’@’192.168.7.%’ |
+—————————————————————————————————————+
2 rows in set (0.00 sec)
If you wanted to temporarily revoke privileges, but leave an account in place for when they return you can use this command:
mysql> REVOKE ALL ON joomla FROM ‘fred’@’192.168.7.%’;
Query OK, 0 rows affected (0.00 sec)
mysql> show grants for ‘fred’@’192.168.7.%’;
+—————————————————————————————————————+
| Grants for fred@192.168.7.% |
+—————————————————————————————————————+
| GRANT USAGE ON *.* TO ‘fred’@’192.168.7.%’ IDENTIFIED BY PASSWORD ‘*5B5BF4EC5CCCB48FE859214A4B27BA4CB038EE0B’ |
+—————————————————————————————————————+
1 row in set (0.00 sec)
There are a lot of different privileges that are available with MySQL, here is a table of most of them.
Name of Privilege What the Privilege Allows
FILE Read and write files on the server host
GRANT OPTION Grant account privileges to other accounts
PROCESS View information about threads that execute within the server
RELOAD Reload grant tables, or flush the logs or caches
REPLICATION CLIENT Inquire about master and slave server locations
SHOW DATABASES See all database names
SHUTDOWN Shut down the MySQL server
SUPER Kill threads, and other supervisory operations
ALTER Alter indexes and tables
ALTER ROUTINE Alter or drop stored functions and procedures
CREATE Create databases and tables
CREATE ROUTINE Create stored functions and procedures
CREATE TEMPORARY TABLES Create temporary tables with the TEMPORARY keyword
CREATE VIEW Create views
DELETE Delete rows from tables
DROP Remove databases and tables
EXECUTE Execute stored functions and procedures
INDEX Create or remove indexes
INSERT Insert new rows into database tables
LOCK TABLES Explicitly lock tables
REFERENCES Unused
SELECT Select rows from tables
SHOW VIEW Show view definitions
UPDATE Make changes to table rows
ALL, ALL PRIVILEGES All operations, except GRANT
USAGE This is a special privilege, that has no privileges
After the “ON” keyword in a command, you can specify whether to apply the privilege globally, just to certain databases, or just to certain database tables.

{ 2 comments }
Well presented!
To make it even easier for beginner I suggest they use phpmyadmin http://www.phpmyadmin.net/home_page/index.php
it will even show u the query after u execute it.
But honestly, I enjoy doing it from the command line!
Well-done!
Husain
Hello,
This is a great article on how to begin working with MySQL! Great work!
One thing I’ve never seen in a beginner article is proper database selection and creating applications that run on many different databases. Invariably, someone wanting to pick up web development will just start reading about PHP + MySQL and think it’s the perfect solution for their next big thing. Then, when their project grows enough for other people to begin working on it, there is so much MySQL-specific stuff in the app that it’s impossible to port to different databases.
I also noted in one of your other tutorials that you’re using payroll information as an example. One of the biggest mistakes that database newbies make is assuming that MySQL is acceptable for mission-critical data. MySQL is great for websites and other things where reliability doesn’t matter, but there are far too many ways by which MySQL silently fails (or eats data) to trust it for accounting and payroll type data.
{ 4 trackbacks }